Host a Single-Page Application
Overview
Many web applications built with modern frameworks, like React, Vue, and Angular, are single-page applications (SPAs) that dynamically handle routing and rendering client-side instead of fetching each rendered page from the server.
By default, Stitch handles requests for a given resource by returning the file hosted at the specified resource path or a 404 if no file matches the path. However, SPAs render in a single, specific HTML file so all requests should return that file regardless of the requested resource path.
This guide covers how you can configure Stitch hosting to redirect all resource requests to a single file to support the SPA pattern.
404 Errors in Single-Page Apps
When single-page application hosting is enabled, Stitch always returns an HTTP 200 response with the app root regardless of the requested route. This means that you cannot specify a custom 404 page for a SPA. Instead, you should include custom code in your application to handle invalid routes.
Procedure
- Stitch UI
- Code Deploy
Upload Your Built Application to Stitch
Single-page applications render in a single, specific HTML file,
typically /index.html. The file should include the necessary
JavaScript code to wire up and render your application, either inline
in a <script> tag or imported from an external file. You’ll also
need to host any resources that you don’t intend to access through a
CDN.
When you are ready to host your SPA, run your application’s build script and then upload the build folder to Stitch.
Configure Stitch to Serve Your Application
Once you’ve started hosting your application files, you can immediately access your SPA by requesting the root html file directly. However, a request to any path other than the root file will return a 404. This can break the expected behavior of a SPA that uses a client-side router or otherwise relies on the URL path.
To configure Stitch to serve the SPA’s root page for all requests:
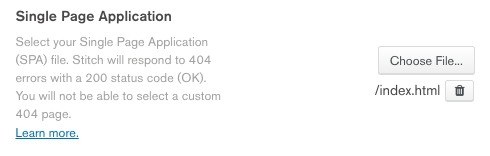
- Navigate to the Hosting page in the Stitch UI and then click the Settings tab.
- Ensure that you have not specified a custom 404 page. If custom 404 is enabled, click the trash can icon ( trash icon ) next to the specified 404 page.
- Next to Single Page Application, click Choose File. Choose the root html file for your SPA and then click Select.
- Click Save.
Get a Local Copy of Your Stitch App
To use code deploy to configure a SPA, you need a local copy of your application directory that is up-to-date with the latest version of your Stitch application. Clone the most recent version of your Stitch app from GitHub or export it directly from Stitch.
Export Your Application
You can export a copy of the latest version of your application directory from the Import/Export App tab of the Deploy page in the Stitch UI, or by running the following command from an authenticated instance of stitch-cli:
Add Your Built Application Code
Single-page applications render in a single, specific HTML file,
typically /index.html. The file should include the necessary
JavaScript code to wire up and render your application, either inline
in a <script> tag or imported from an external file. You’ll also
need to host any resources that you don’t intend to access through a
CDN.
When you are ready to host your SPA, run your application’s build
script and then copy the output build folder into the
/hosting/files directory of your application directory.
Configure Stitch to Serve Your Application
In stitch.json, set the value of
hosting.default_response_code to 200 and set the value of
hosting.default_error_path to the resource path of your SPA’s root HTML file. Make sure to
save the file when you’re done.
Deploy Your Changes
Now that you’ve added the SPA code to the hosting/files directory
and configured Stitch to serve the root HTML file, all that’s left is
to deploy the changes.
Navigate to the application directory root and then run the command that matches your deployment method.
If you want to deploy with Stitch CLI:
If you want to deploy automatically with GitHub: